


Beyond the Basics: How to Do an In-Person Site Survey for Complex Drone Missions
By Colonel (ret) Bernie Derbach, KR Droneworks Academy, 28 Aug 26
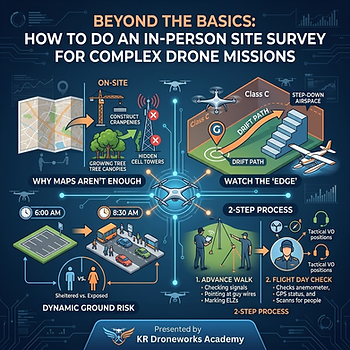
Under Transport Canada CAR 901.27, every drone pilot must complete a site survey before flying. The rule requires you to check airspace, nearby airports, weather, and physical hazards.
For simple flights in an open field, checking a map on your computer might be enough. But for Level 1 Complex missions—looking at a computer screen is not enough.
At KR Droneworks, we treat basic regulations as the starting point, not the finish line. A truly safe mission requires an Enhanced Site Survey with two mandatory in-person visits: one advance scouting trip, and one final check on the day of the flight.
+-----------------------------------------------------------------+
|                       THE 2-STEP SITE SURVEY                    |
|                                                                 |
|[Step 1: Advance Visit (Days Before)]  ===>  [Step 2: Flight Day Check (Hours Before)  ]|
| - Walk the area & spot hidden obstacles           - Check for new crowds or roadwork   |
| - Check crowd patterns and busy times             - Test for radio signal interference |
| - Find emergency landing spots                    - Measure wind between buildings     |
| - Check for low-flying planes & nearby airspace   - Position Visual Observers (VOs)    |
+-----------------------------------------------------------------+
1. Why Desktop Planning Is Not Enough
Satellite maps and online charts are often out of date. Construction cranes can appear overnight, trees grow, and crowd sizes change depending on the time of day.
What You Check | What the Map Shows | What You Find In Person |
People on the Ground | An empty commercial zone. | School rush hours, lunch trucks, and busy bus stops. |
Nearby Airspace | Uncontrolled airspace (Class G). | Low-flying air ambulances, floatplanes, and private airstrips. |
Signal Interference | Normal signal range. | Hidden 5G cell towers and power equipment that scramble drone sensors. |
Obstacles | Flat, clear terrain. | Thin guy-wires, temporary cranes, and tall fences blocking your line of sight. |
2. Watch the "Edge" of Controlled Airspace
If your flight is 500 meters outside a NAV CANADA controlled zone (Class C), you are legally flying in uncontrolled airspace (Class G). But what happens if your drone has a mechanical failure or loses signal?
+---------------------------------------------------------------+
|                 CONTROLLED AIRSPACE (CLASS C)                 |
|             (Severe safety risk if your drone drifts in)      |
+---------------------------------------------------------------+
                                  ^
                                  |  [Drift / Fly-Away Path]
                                  |
+--------------------------------+--------------------------------+
|                      BUFFER ZONE (Safety Margin)                |            |                                                                 |
|   +-------------------------------------------------------------+
|   |                  YOUR PLANNED FLIGHT AREA                   |    |	|						[ Drone ]                            |
|   +-------------------------------------------------------------+    |                                                                 |
+-----------------------------------------------------------------+
The Drift Zone: If your drone flies at 40 km/h and loses connection, it can cross into controlled airspace in under a minute. Your survey must include a wide safety buffer around your flight zone.
Overhead Airspace Steps: Controlled airspace often steps down like an upside-down staircase or wedding cake. If you climb up to avoid an obstacle, you might accidentally enter controlled airspace directly above you.
Low-Flying Aircraft: Floatplanes and hospital helicopters do not always use big airport runways. They fly low over rivers, lakes, and city helipads. Always scout the local area for unlisted landing spots.
3. Counting People: Ground Risk Changes by the Hour
International safety guidelines like JARUS SORA and EASA Guidelines focus heavily on one thing: the risk of hitting someone on the ground.
Census data only tells you where people live, not where they walk. During your in-person visits:
An empty farmers field one day may become very busy at harvest time or the farmer may have rented it out for a traveling circus to set up for several days. Track the
4. The 2-Step In-Person Survey
Step 1: The Advance Walk-Through (Days Before the Flight)
Visit the site around the exact time of day you plan to fly:
Walk the Flight Path: Make sure trees, hills, or buildings won't block your direct view of the drone.
Check for Signal Problems: Look for high-voltage power lines, metal roofs, and cell towers that can confuse the drone's compass and GPS.
Pick Emergency Landing Zones (ELZs): Find at least two clear spots (empty grass, fenced areas) where you can land safely if something goes wrong.
Get Site Access: Make sure gates will be unlocked and property owners know you are coming.
Step 2: Flight Day Check (Right Before Launch)
Things change quickly, so do a final check upon arrival:
Check for New Hazards: Look for pop-up events, etc.l
Measure Local Winds: Wind can speed up and swirl in narrow spaces between tall buildings (the wind tunnel effect).
Check GPS Quality: Use an app to confirm good satellite connections and check for solar storms via the NOAA Space Weather Center.
Double-Check Your Landing Spots: Make sure your emergency landing zones are still completely empty.
5. Setting Up Your Visual Observers (VOs)
For complex missions, putting your Visual Observer right next to the pilot does not give you good safety coverage and may not meet regulation requirements for the BVLOS distances you plan to fly. . Spread your crew out with clear roles:
[ Observer 1: Watching and scan the the Sky in the area of the drone ]
       \
        \ Looking toward area of the drone (Sun at their back)
         v
     [ Drone Path ] <================ [ Pilot at Launch Pad ]
         ^
        / Two-Way Radio Headset Link
       /
[ Observer 2: Watching the Ground ]
Keep the Sun at Their Back: Position observers so they aren't staring into bright sunlight or glare.
Split the Jobs:
Observer 1 (Sky Watch): Scans 360 degrees for low-flying helicopters, planes, or birds.
Observer 2 (Ground Watch): Watches the ground perimeter, warning pedestrians who walk near your landing area.
Use Clear Two-Way Radios: Use wireless headsets so the team can talk instantly without shouting over traffic or drone noise.
6. Complex Mission Checklist
Step 1: Advance Planning & Scouting
[ ] Map Airspace: Check boundaries for nearby controlled zones and step-down shelves.
[ ] Locate Aerodromes: Find all airports, helipads, and water aerodromes in the Canadian Flight Supplement (CFS).
[ ] Walk the Site: Spot thin wires, antennas, and hidden blind spots.
[ ] Check Signal Hazards: Scan for large metal structures and strong radio transmitters.
[ ] Pick Landing Zones: Mark your primary launch pad and backup emergency landing spots.
Step 2: Flight-Day Final Checks
[ ] Audit the Ground: Make sure no new crowds or work crews have entered your safety buffer.
[ ] Check the Weather: Measure local wind speeds and building gusts at ground level.
[ ] Check GPS Signals: Confirm high satellite counts and low signal errors.
[ ] Recheck KP index current and anticipated as well as the Canadian CANMOS site for Z-axis activity nearest to your location
[ ] Set Up Observers: Place observers out of the sun's glare and test two-way radio connections.
References & Aviation Links
Transport Canada: CARs Part IX - Drone Regulations
Transport Canada: Standard 922 - RPAS Safety Assurance
NAV CANADA: Drone Flight Planning Tools
FAA: Part 107 Drone Rules


Comments